Page 2 of 3
Re: Building and fitting an adjustable butt plate
Posted: Thu Oct 06, 2011 7:42 am
by Christel
Yes, you need a milling machine

Noted.
Re: Building and fitting an adjustable butt plate
Posted: Thu Oct 06, 2011 11:14 pm
by Alpha1
You should of said when you asked for the plate if you had given the dimensions I could of milled them for you.
Would of saved you a lot of work.

Re: Building and fitting an adjustable butt plate
Posted: Fri Oct 07, 2011 6:58 am
by ovenpaa
Alpha1 wrote:You should of said when you asked for the plate if you had given the dimensions I could of milled them for you.
Would of saved you a lot of work.
Hehehe! I forget you have access to such stuff. I am enjoying myself so far and the improvising keeps mind my occupied. For me the important part is it looks like a proper one and I am sure I will get there. A milling machine is going to make a difference to my work though.
I have a little plan to change the way I do things and add a couple of very modest machines to my shed, a mill is certainly one as I can use it as a pillar drill as well and a bench mounted disk sander is also on the list. I always try to work to the rule that I must have at least five proper jobs that need a tool before I buy it, and then quality wise buy something that is based on how much it will be used. Low duty tools need not be of as good quality as long as they work.
Re: Building and fitting an adjustable butt plate
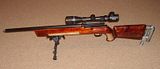
Posted: Fri Oct 07, 2011 7:09 pm
by 1066
Ok - Here's my effort. It on a "long range rabbit rifle" project I'm putting together, based on a Russian CM2 .22LR single shot target rifle.

Re: Building and fitting an adjustable butt plate
Posted: Fri Oct 07, 2011 7:24 pm
by Dougan
1066 wrote:Ok - Here's my effort. It on a "long range rabbit rifle" project I'm putting together, based on a Russian CM2 .22LR single shot target rifle.
Another nice job

That's made me think - I was going to use the cheap 'Bisley' type butt plate, but I do have an old Anschutz one similar to the one you've used. One is light and just moves up and down, where as the other is heavy, and moves up and down in a slight arc :-P
Re: Building and fitting an adjustable butt plate
Posted: Fri Oct 07, 2011 7:41 pm
by ovenpaa
1066 wrote:Ok - Here's my effort. It on a "long range rabbit rifle" project I'm putting together, based on a Russian CM2 .22LR single shot target rifle.
A handy looking job is that the CM2 that was at Newark for a very decent price this year?
Re: Building and fitting an adjustable butt plate
Posted: Fri Oct 07, 2011 7:48 pm
by 1066
Dougan wrote:1066 wrote:Ok - Here's my effort. It on a "long range rabbit rifle" project I'm putting together, based on a Russian CM2 .22LR single shot target rifle.
Another nice job
That's made me think - I was going to use the cheap 'Bisley' type butt plate, but I do have an old Anschutz one similar to the one you've used. One is light and just moves up and down, where as the other is heavy, and moves up and down in a slight arc :-P
I had this CM2 from about the mid 70's when I used to shoot prone .22 but pistol shooting took over and the old CM2 has sat in the back of the cupboard gathering dust. I thought it was time to put it to some use.
The sliding butt plate is the original CM2 fitting but the butt was much too short for use with a scope so put in some 1" dia alli spacers about 1.5" long then I decided to make up the mono-pod fitting. I very pleased with the way it works, the next job is to strip the stock and refinish.
Re: Building and fitting an adjustable butt plate
Posted: Fri Oct 07, 2011 8:08 pm
by ovenpaa
A nice functional job as well, I like the locking mechanism for the mono-pod. Do you have any other projects on the go at the moment?
Re: Building and fitting an adjustable butt plate
Posted: Sat Jan 14, 2012 9:44 pm
by Dougan
Inspired by the engineering projects of some members (which are way beyond me..) - I decided to finally have a go at the butt on my GR....(still cocked it up though :roll: :lol: )
The Marlin rubber butt piece came off easier than expected after removing the 2 screws; but it showed that the butt had been drilled twice for some reason?
The 'Bisley butt plate' I was putting on was oversized by about 2/3 mm all round, so I used my old man's grinder to shape it...after making a template; as shown earlier
Then I screwed up a bit (scuse the pun

) - I didn't wan't to use the existing lower screw hole, as I didn't want to split the stock; so I drilled and counter-sunk (and that's serious engineering for me....) another hole - I decided to use the existing screws, but didn't realise they were brass (they were black)...and sheered it off (

) - so, ended up having to use the lower hole, and put the screw in at an angle.
Fortunately you can't see the 'error' (
) when the rubber piece is on, and I managed to get a chamfer (if that's what you call it?) back on the plate, using the fine grinder and emmery paper...and it doesn't look to bad finnished (phew!):
Re: Building and fitting an adjustable butt plate
Posted: Sat Jan 14, 2012 9:49 pm
by Dougan
Anyway; it doesn't look bad, and more importantly, it brings the stock into the right shoulder possition.
...just have to sort out a tempory cheek piece...and then see if I can shave a few points off my 'T&P' scores this year


