one of my first posts, I hope it is useful.
Some of you may already have seen this on UK varminting but I am one for sharing the love and spreading the word :)
Hi All,
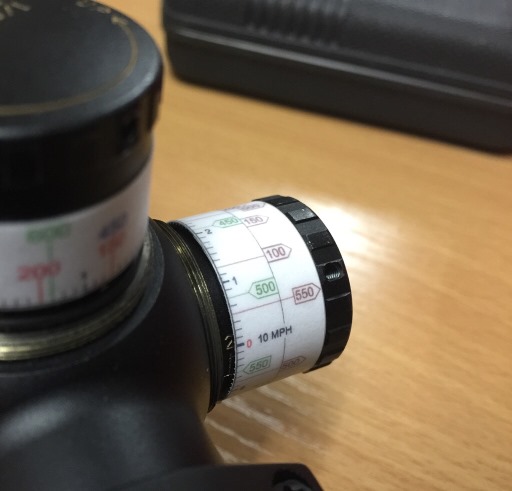
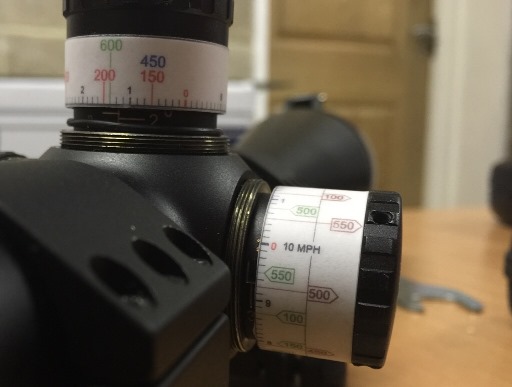
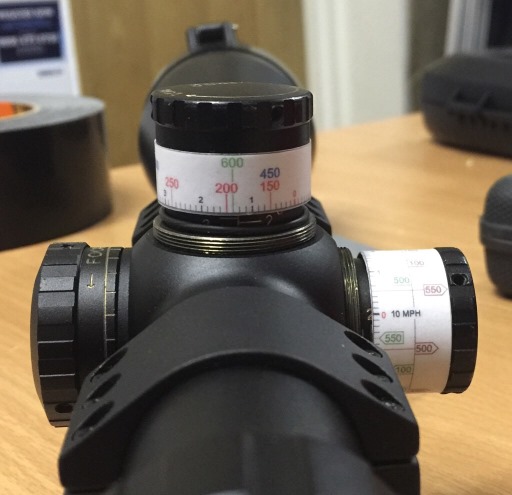
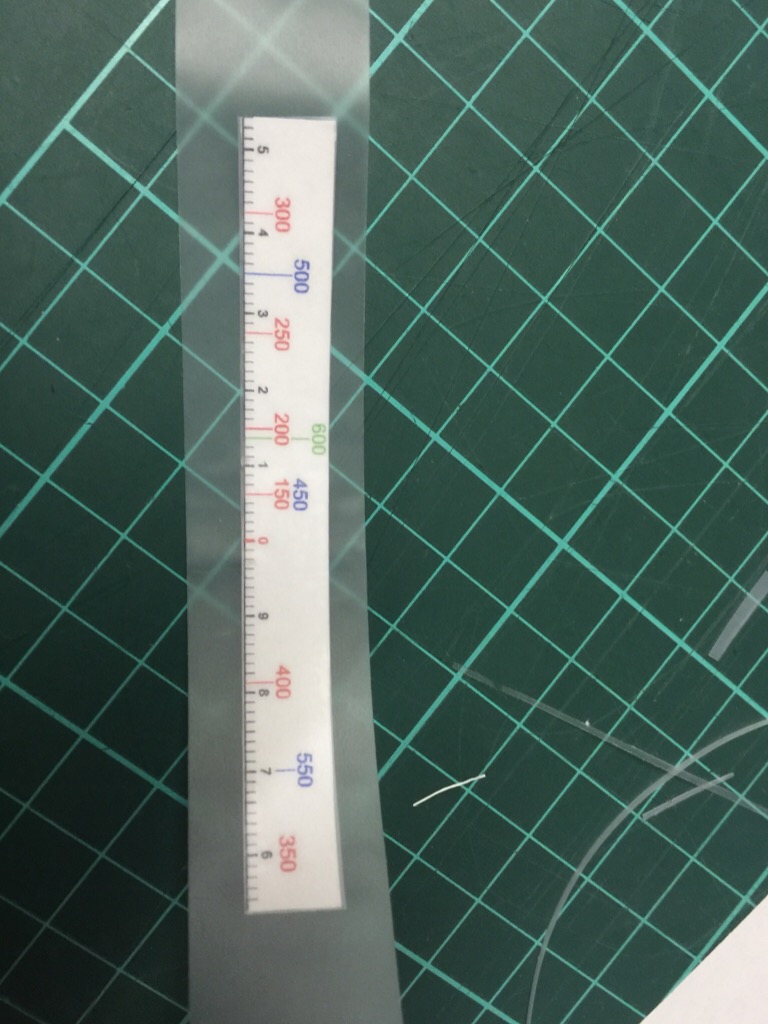
Not sure if this is useful to anyone or not but these are my MKii turret wraps (MKi were an excel botch)
I took my inspiration from here, with the hope of making them easier to produce:
http://ukvarminting.com/forums/topic/14 ... -sightron/
File Library
If you do make some, please do share the QCAD file as it might help out others with the same scope. (PM me and I can upload it to my hosting if necessary)
You can obviously just take the base measurements and build your ballistic data on top.
.223 on Sightron 8-32x56 1/8th http://www.duckboy.co.uk/randompics/sco ... turret.dxf
Other options
Further down in the thread people have started to add their own options for creating these. I've not tested them out but in the interest of knowledge sharing here they are:
Adobe Illustrator http://ukvarminting.com/forums/topic/24 ... 20%20wraps
An online tool (Similar to what we hoped to create) http://www.leonsoft.it/customturrets/
I tried excel at first (I use it a lot for work) but it just isn't a precise enough tool for this.
In the end I used the free tool QCad, now I've got the learning curve out the way these can be made relatively quickly.
These print directly and exactly, no faffing with printing percentages or anything, I just popped these out on my inkjet
Definitely some finessing to do with them, I also need to create a colour wrap for the actual turret to make it clear which range colour I am reading.
These are for my .223 on my sightron with 1/8th turrets but I've not double checked the figures yet as I wanted to prove the concept.
Sorry not the best images
Ok so I have started to write it up but screenshots take ages!
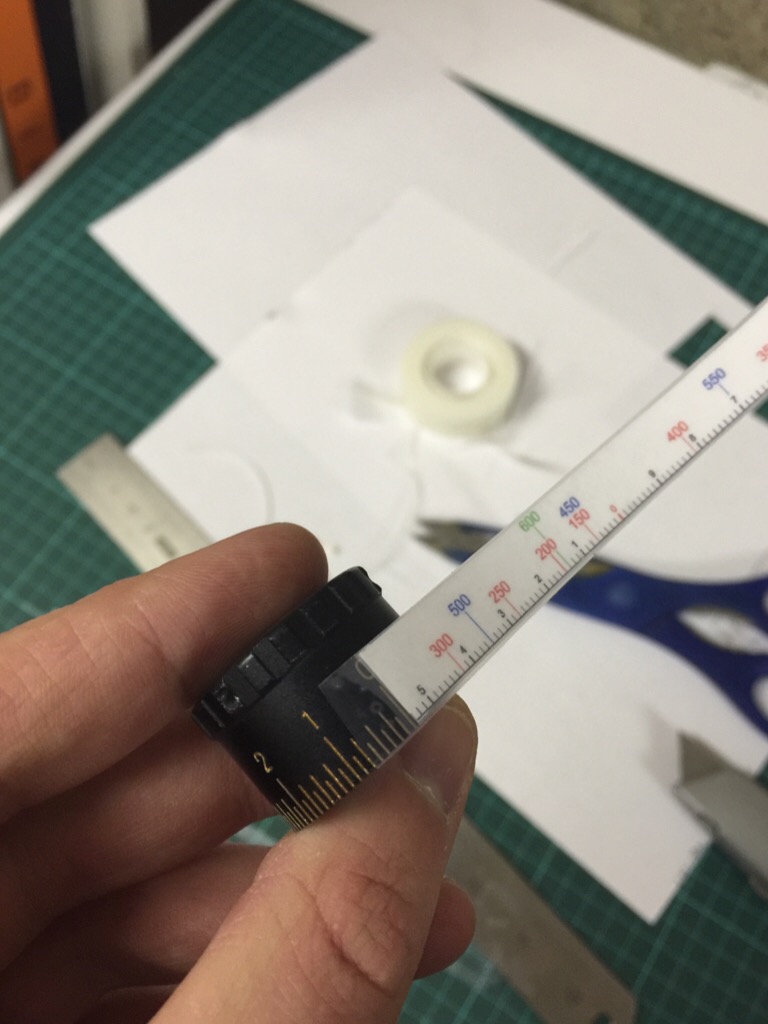
Measuring up
Turret
First thing is to figure out the circumference of your scope turret.
You can do a couple of things, least technical is cut a bit of paper, wrap it around your turret, mark it off and measure.
The method I used was to use calipers to measure the diameter then multiply by pi (mmm pie) or do it in Google.
For my Sightron this gave me a nice round 80mm
Next count the clicks, my turret has 80 clicks per revolution which very helpfully makes each click 1mm
Also a useful measurement is the height of the area you want to stick the wrap to so you know what space you have to work with
Diameter = 25.477
Pie = 3.14
Clicks = 80
25.477 * 3.14 = 79.99 so I rounded to 80mm for the diameter
80mm / 80 clicks = 1mm per click
Decide what you want!
This might be an obvious step, but QCad isnt the most user friendly tool and re-working can be a bit of a pain!
This is what my mark-ii look like, but I will be tweaking this a bit I think, I should have thought it through a bit more
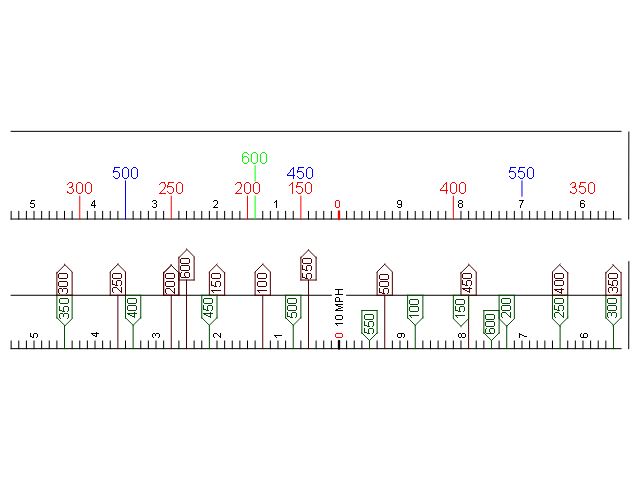
If you want to pilfer this turret the qcad file is here:
http://www.duckboy.co.uk/randompics/sco ... turret.dxf
Qcad
http://www.qcad.org/en/qcad-downloads-trial
Setting Up
Qcad is a bit daunting to start with, but in reality were going to use about 1/10000th of what is in here.

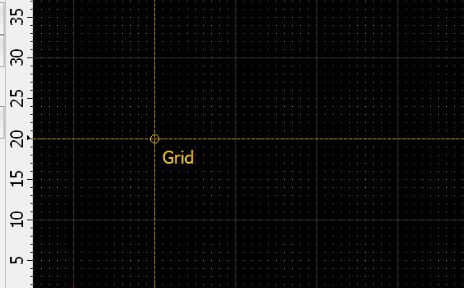
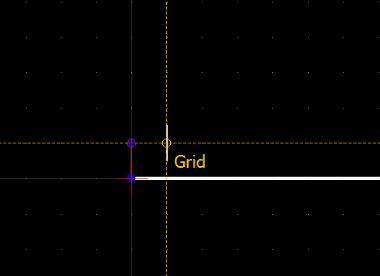
If the grid isnt showing, go to: view > grid and it should show
Now go to Snap > Grid nothing will happen but if you go back to the snap menu, grid should be highlighted.
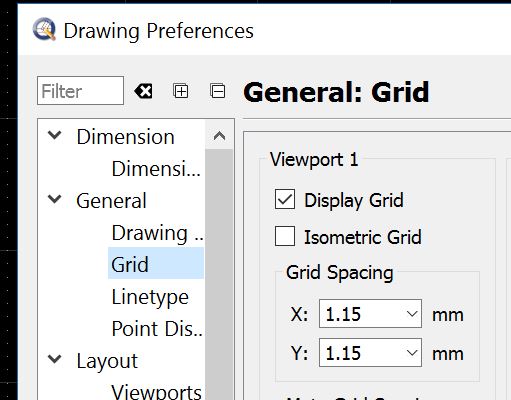
Finally lets set the grid up to match your click distance which makes life a LOT easier. Go to Edit > Drawing Preferences (Make sure it is drawing and not application) and then click Grid. Alter the X & Y settings for viewport 1 as below for example (in my example it should be 1mm this is just an example):
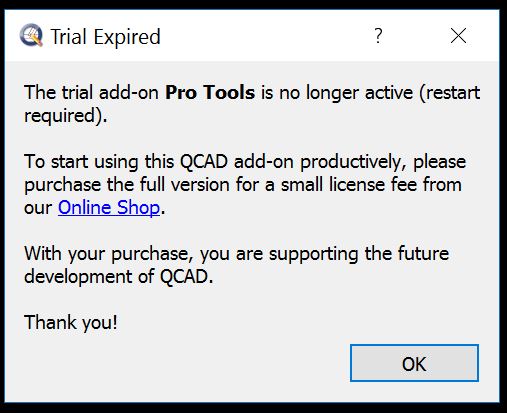
By now youve probably had this error message, but that is ok you can just OK it and crack on for now:
NOTE ABOUT COLOURS
There is an additional section added below about adding a coloured background, you can do this first if you want which might make life easier
Setting up
Lets set up out working area.
First step is the base line, this should be the circumference of your turret.
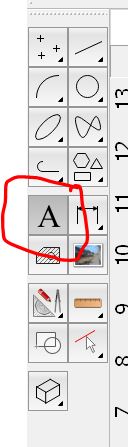
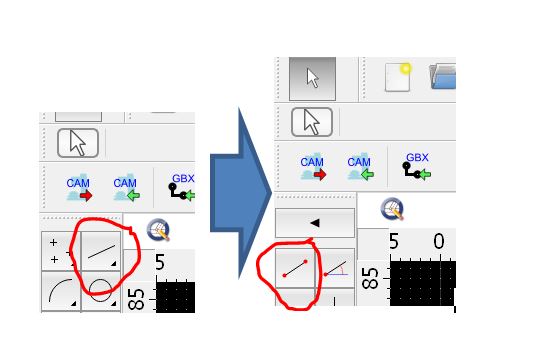
Use the line tool by clicking on these:
http://www.duckboy.co.uk/randompics/scope_wrap/sc4.JPG[/img]
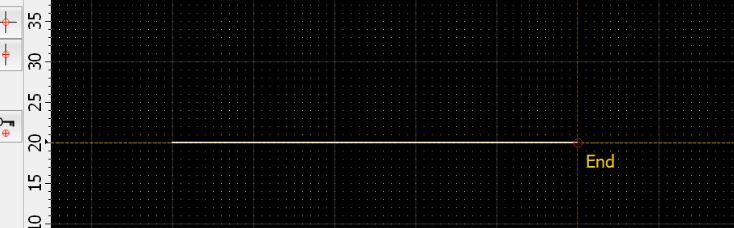
Click somewhere on the grid to start the line (it doesnt matter where right now)
Then click somewhere else to end the line (again anywhere), at this point you want to hit esc on your keyboard so you dont end up with this:
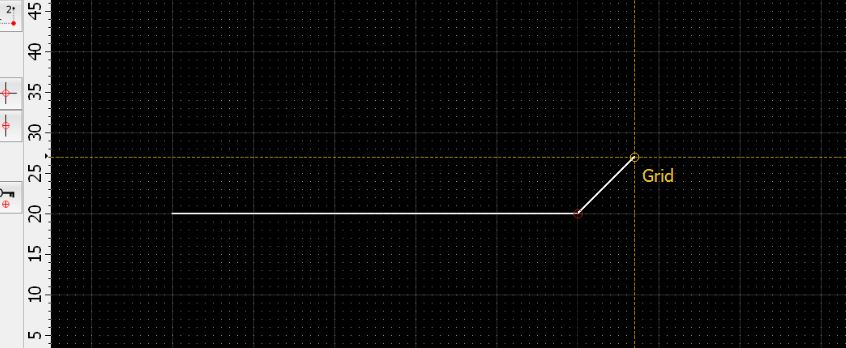
You should end up with this:
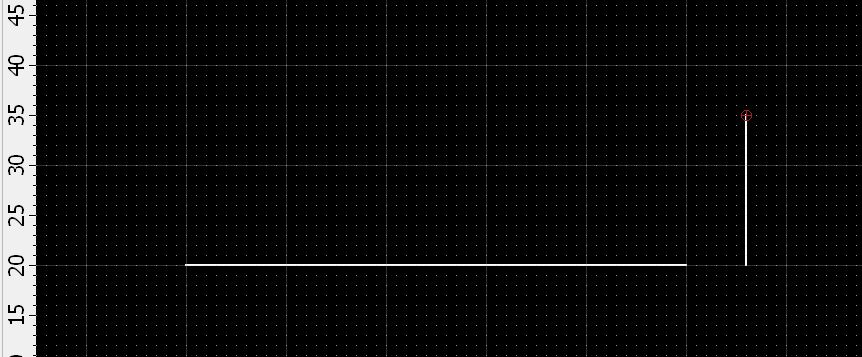
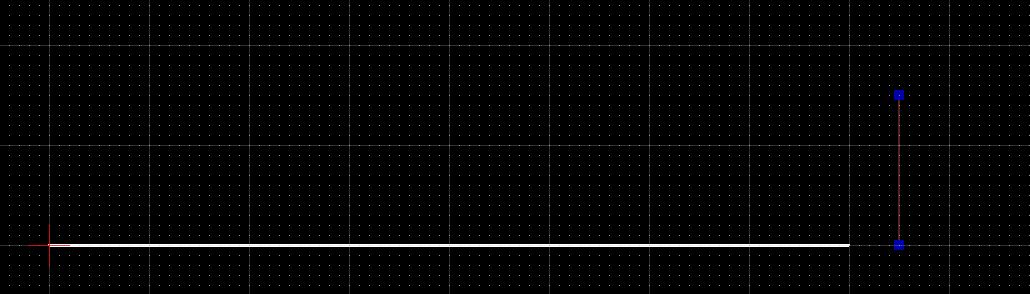
Now do the same and make a vertical line- this will be your measure for the height so you know your working area. Hopefully you now have something that looks like this.
Once you are done then you need to deactivate the line tool, click the arrow icon just below the File menu
The next bit is a little bit tricky, but it is good get used to the manual way of working as it is a lot more exact than dragging and drawing.
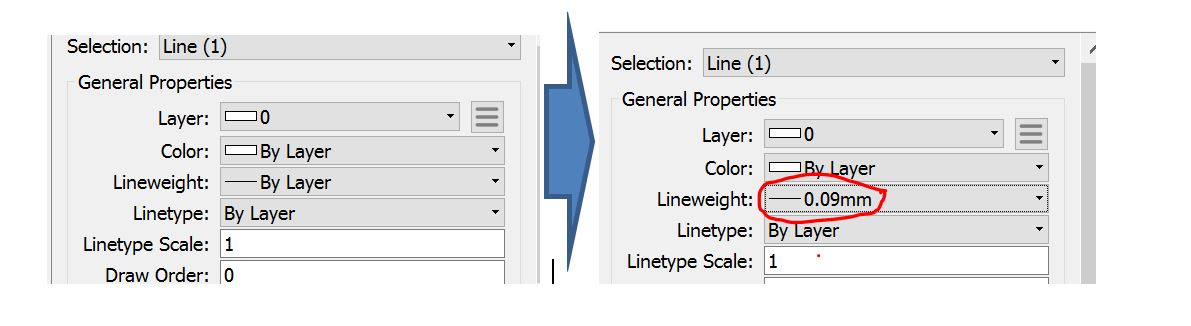
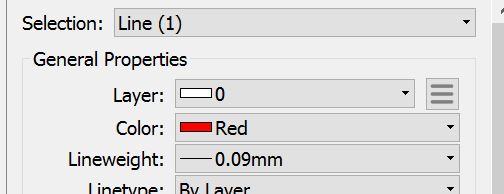
Select the horizontal line by clicking on it, it should go red. Then look at the Property Editor box on the right hand side.
We will set this line to be in position 0,0 (to make life easier) and we will set the length to be the circumference of the scope turret.
For example this is the before and after:
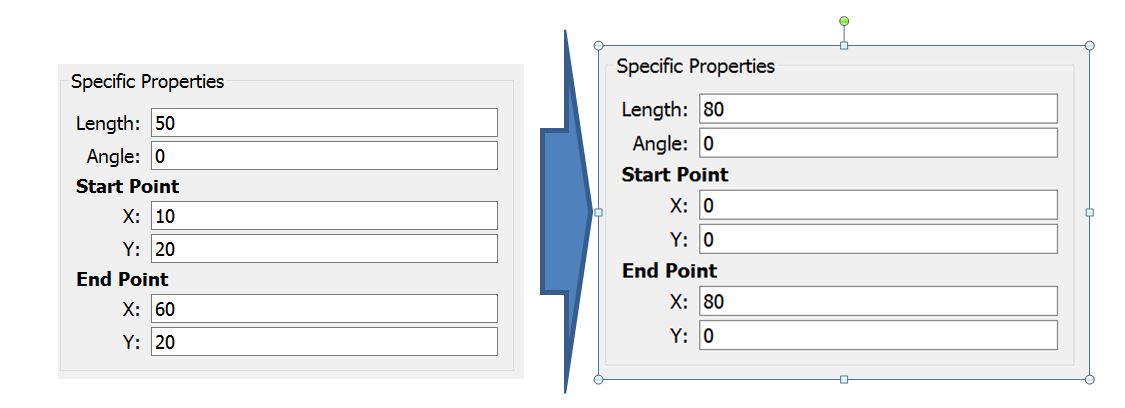
Set the start to 0,0 and the end to 80,0 (80 being the circumference)
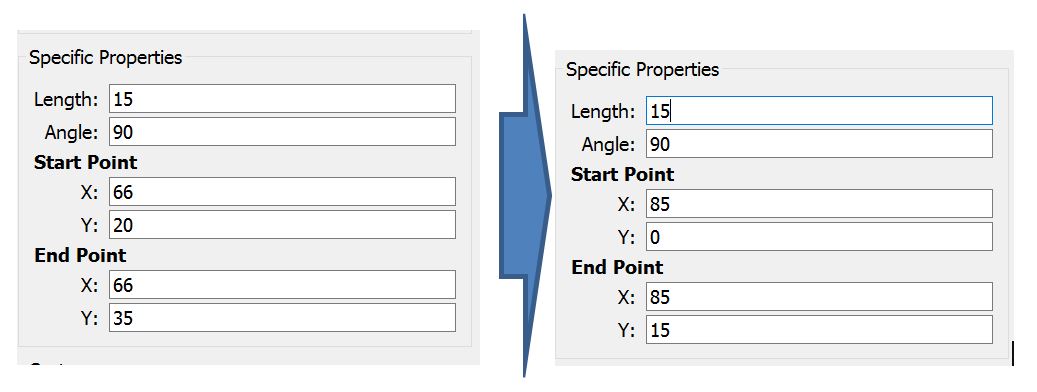
I did the same for my height line, and put it off to the right a bit (as we dont actually want it for printing). My turret has 15mm of space to stick the tape
So I now have something which looks like this:
The final adjustment you can make is to make the line a little thinner, this is done in the same box:
Adding the Detail
Note that if anytime you need to get closer, use the View > Zoom functions which are in the menu. Then use the scroll bars to re-centre the window.
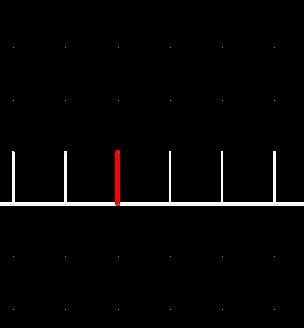
Now it is time to add the bits and pieces, firstly we will add our hash marks.
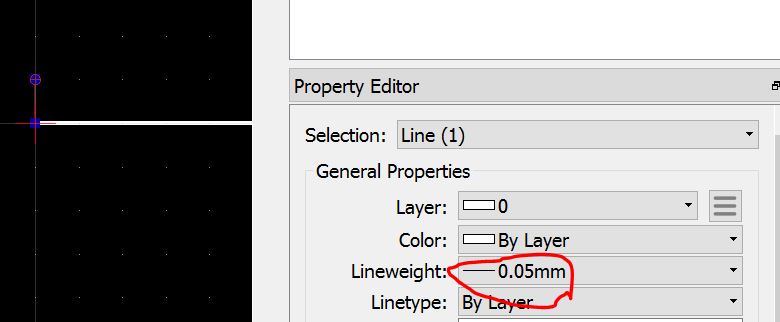
Lets break out the line tool again and make one hash mark.
Clicking on the far left grid point to start the line, then on the point above it and then hot esc on the keyboard to finish. Hopefully you now have a nice fat vertical line:

Select the line and then use the property editor to set the lineweight to be a little smaller, I used 0.05mm for my hashes
Copying this 79 times
We need 79 more hashes so lets make it easy.
With the line selected (it should be red) copy it using ctrl+c or edit > copy then paste it again straight away using ctrl+v or edit>paste then when you move the mouse you will have a new line you can place.
This is where I have found Qcad to be a bit annoying (I am sure there is a way around it) but it grabs the middle of the line which you can then snap to grid.
So if you move the line one grid to the right and slight up, it should pop up and say grid, at which point you can click the mouse and it will place the line
Where Qcad is helpful is that it keeps pasting until you click escape, so keep clicking and pasting lines until you have filled the strip, however note than you dont need one on the other end, as this is where the paper will join up
At some point you might have to use the scroll bars to move around, just do it, you dont need to deselect or anything, move the scroll and then go back to clicking to paste.
Once done, zoom out a bit so you can see the whole thing

Beautiful.
Firstly congratulations if you have made it this far without getting bored or lobbing the computer across the room.
Next step is to lower these additional lines down so they sit nicely on our baseline (or leave them here if you like them floating!)
Do a click + drag and draw the square out over all the lines so that they are selected

Then just adjust the Y figures in the properties box to shift them down

And hey presto, you have a beautiful scale!

Printing the file
At this point I would suggest printing this out and making sure that it matches up with your scale.
To do this we need to exit the program and reopen it to re activate the pro tools. So, save the project File > Save as (ignore the warning) then close the program and re-open it again.
Now, you can click the little icon which says svg on the toolbar, just under Dimension and then save the file somewhere, the desktop is always a good bet.
Now, you can open this file in internet explorer and then just print it as you would anything else.
Making it work
Right, then it just comes down to making things how you want them, Ill go through a couple of bits here as an example, but really it is all just using the properties box to change line heights and colours, then adding text.
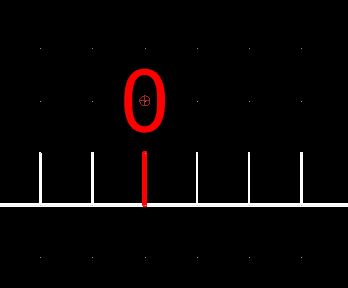
Lets add a zero point
Pick a hash mark roughly ½ way along, I suggest this because you dont want a major unit on the join line, and also you want the join to be opposite the 0 on the turret so youre not staring at it the whole time.
Then use the properties box to make it a bit fatter and also a different colour if you like:
Here is my slightly fatter red line
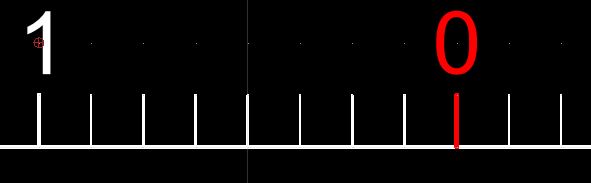
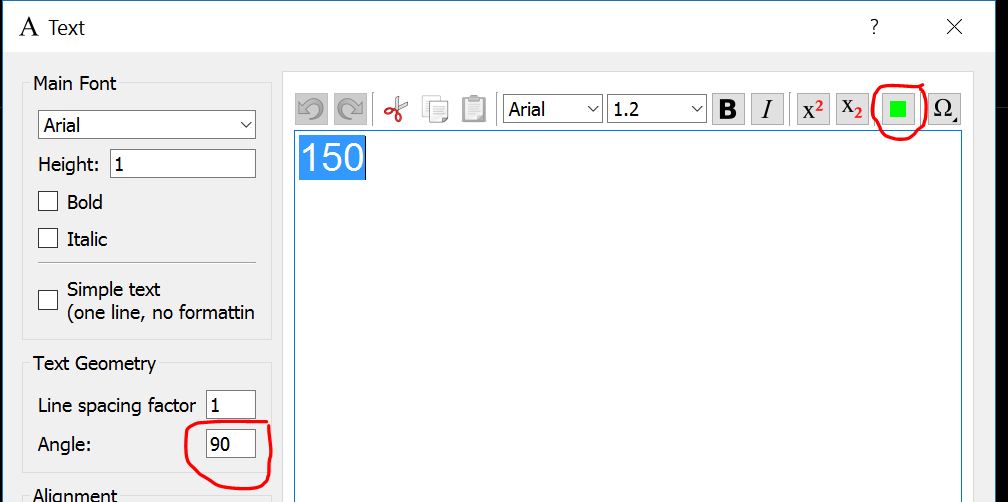
Adding Text
Use the text tool to open up the text entry box
This pops open the text entry box, note the two areas I have circled as this lets you adjust the size and also the colour. The size box you can directly type in if you need some in-between sizes, for example 1 is select-able, 1.5 is select-able but if you want 1.2 you have to type it in to the box.
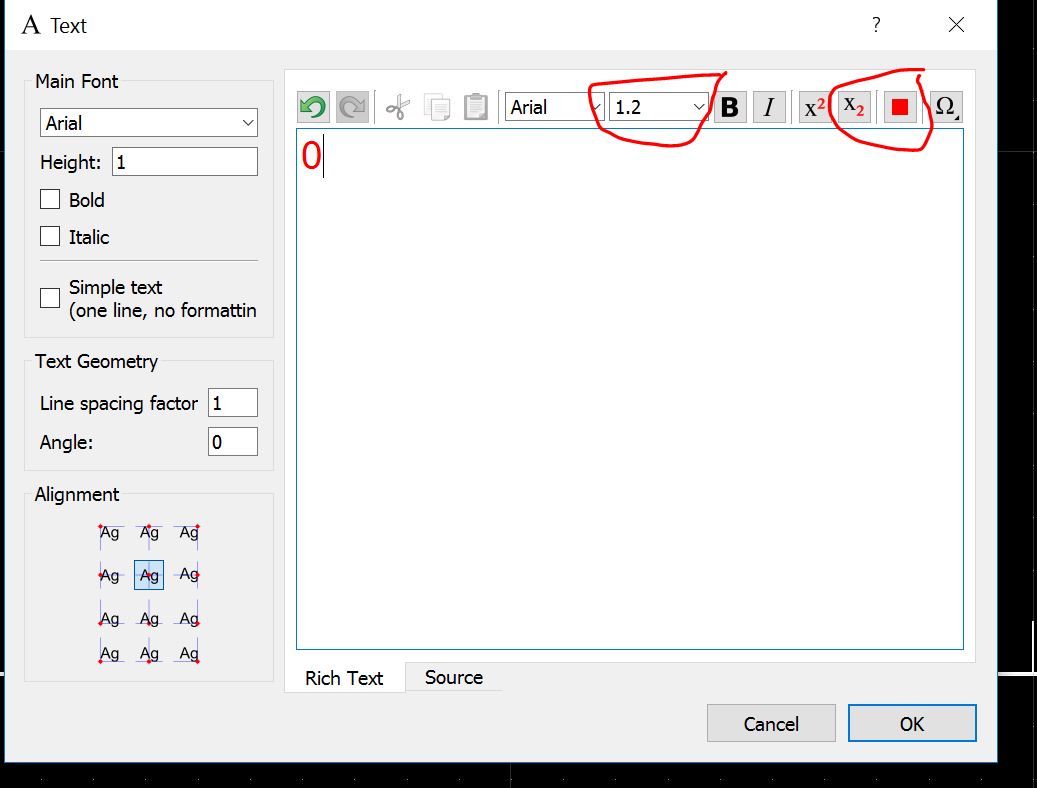
When you hit the OK button, then it will take you back to the grid where you can then click to place the text.
If you need to edit the text at any point, you can just double click it and the text box will re-open.
If you then want to add back your original scale, its just a case of counting the hashes/clicks and making the lines bold and adding text, you can copy the text or add new text. With the snap to grid on, it can be a bit of a pain to line the text up so you can turn the snap to grid off, or use the properties to make adjustments to the x and y values to move it
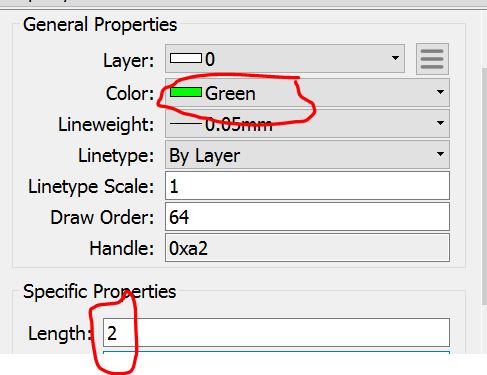
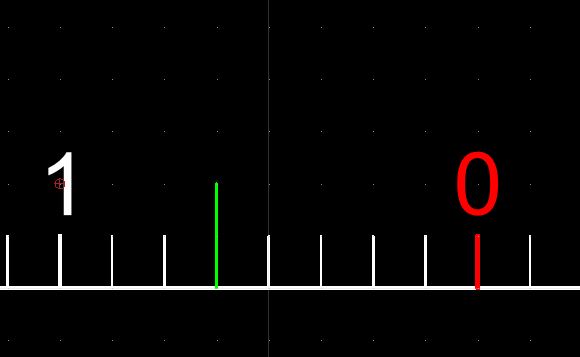
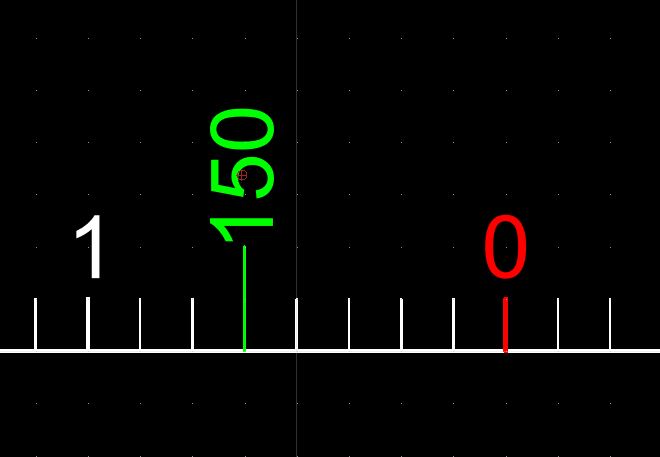
Adding range markings
I used the iOS app, Sako Ballistics and also the Hawke BRC app to generate and double check the clicks per range adjustment required for my particular rounds.
This is the table for my .223 round

So for my 150 yard range marking, I just count five clicks from 0 and then lengthen the line and make it green for example.
Now this time when you add the text (using the text tool) you can use the angle box to rotate the text before you place it
Basically just repeat and continue to build the wrap up with the ranges for your round.
As requested- changing the background colour (line colours are just changed by selecting them all and changing the drop down as we learned above)
1- Draw a square
2- 'hash' it with a solid colour
3- change the colour
4- change the draw order to make it a background
Click this button

Click this button in the sub menu
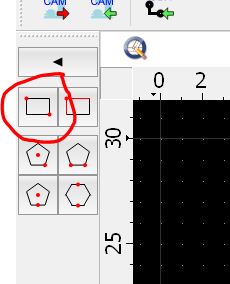
As we learned before, click once to start the shape, then drag it out to where you want and click to finish the shape.
I just made a square which covered my whole area and then some.
Once you have the square selected click on the 'hash' button
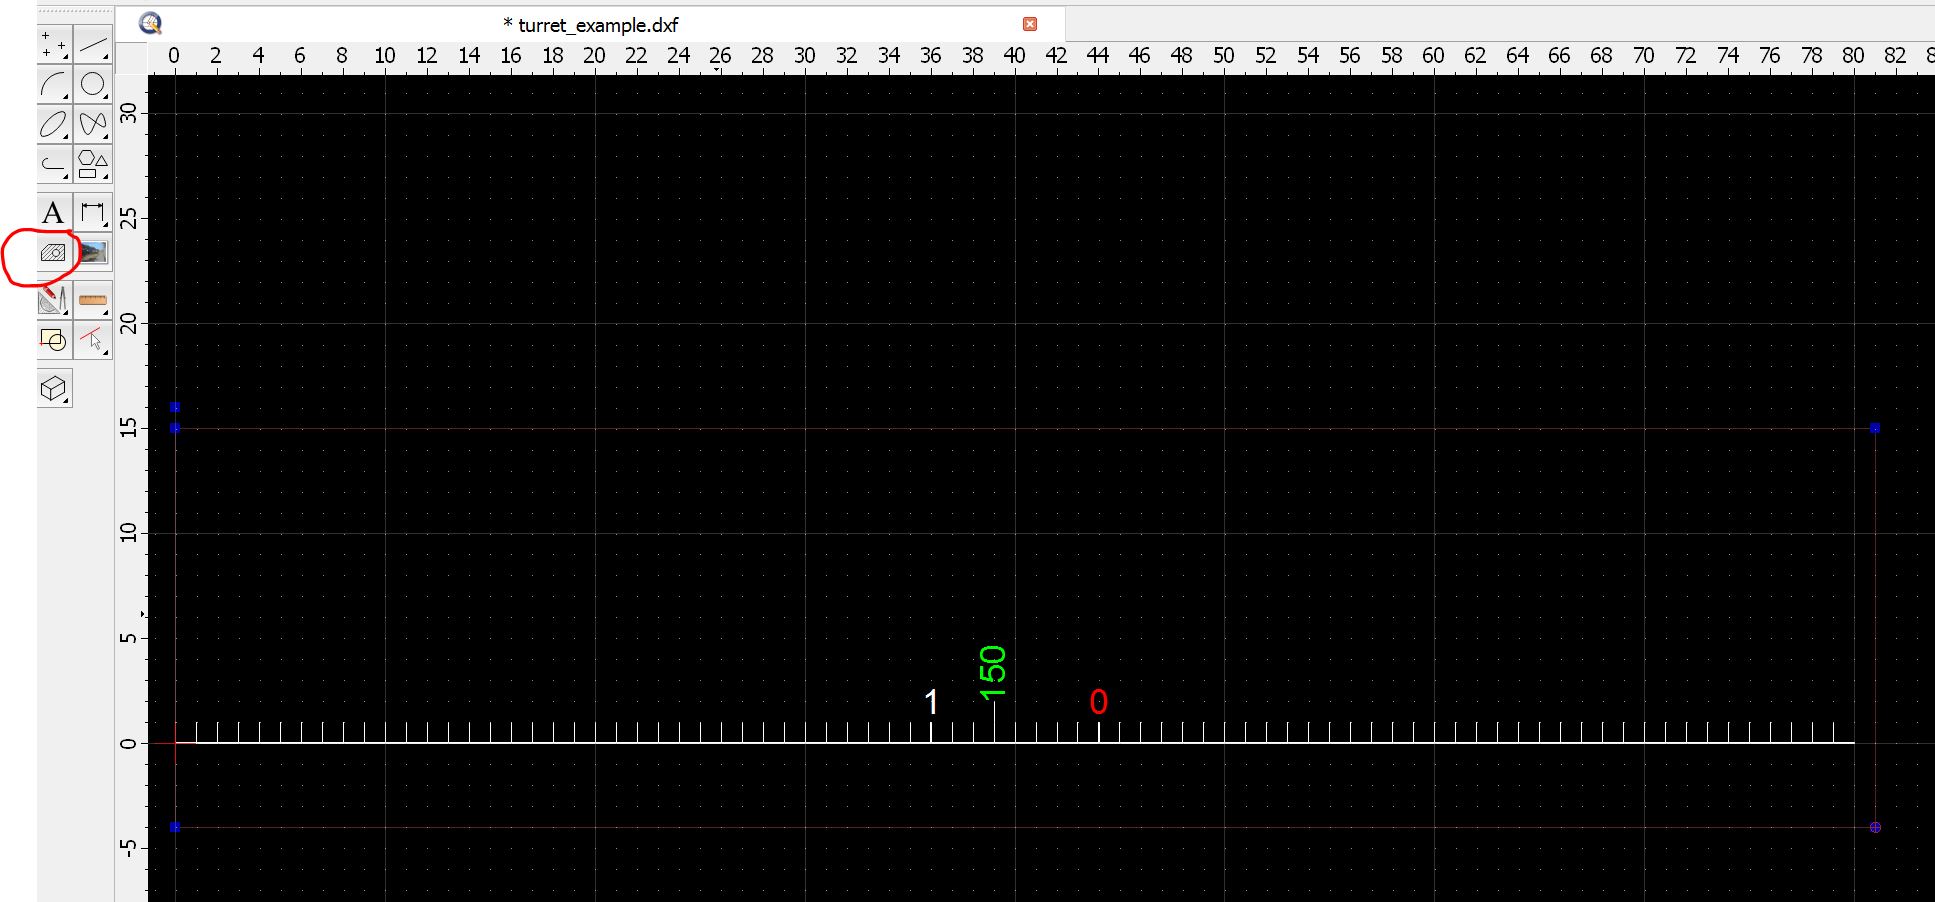
Just OK this box
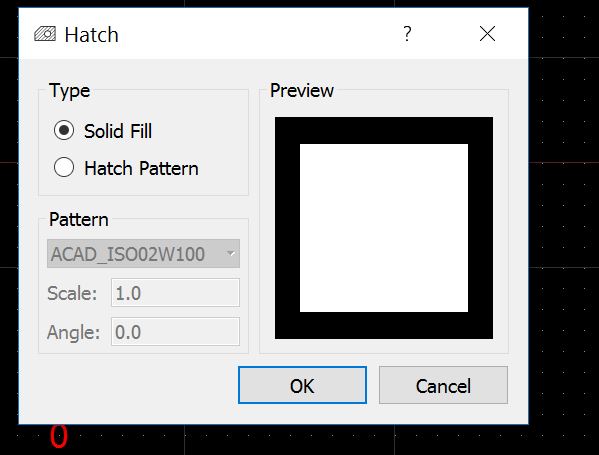
finally click on the solid square to select it, change the colour to the one you want, and set the draw order to a negative number
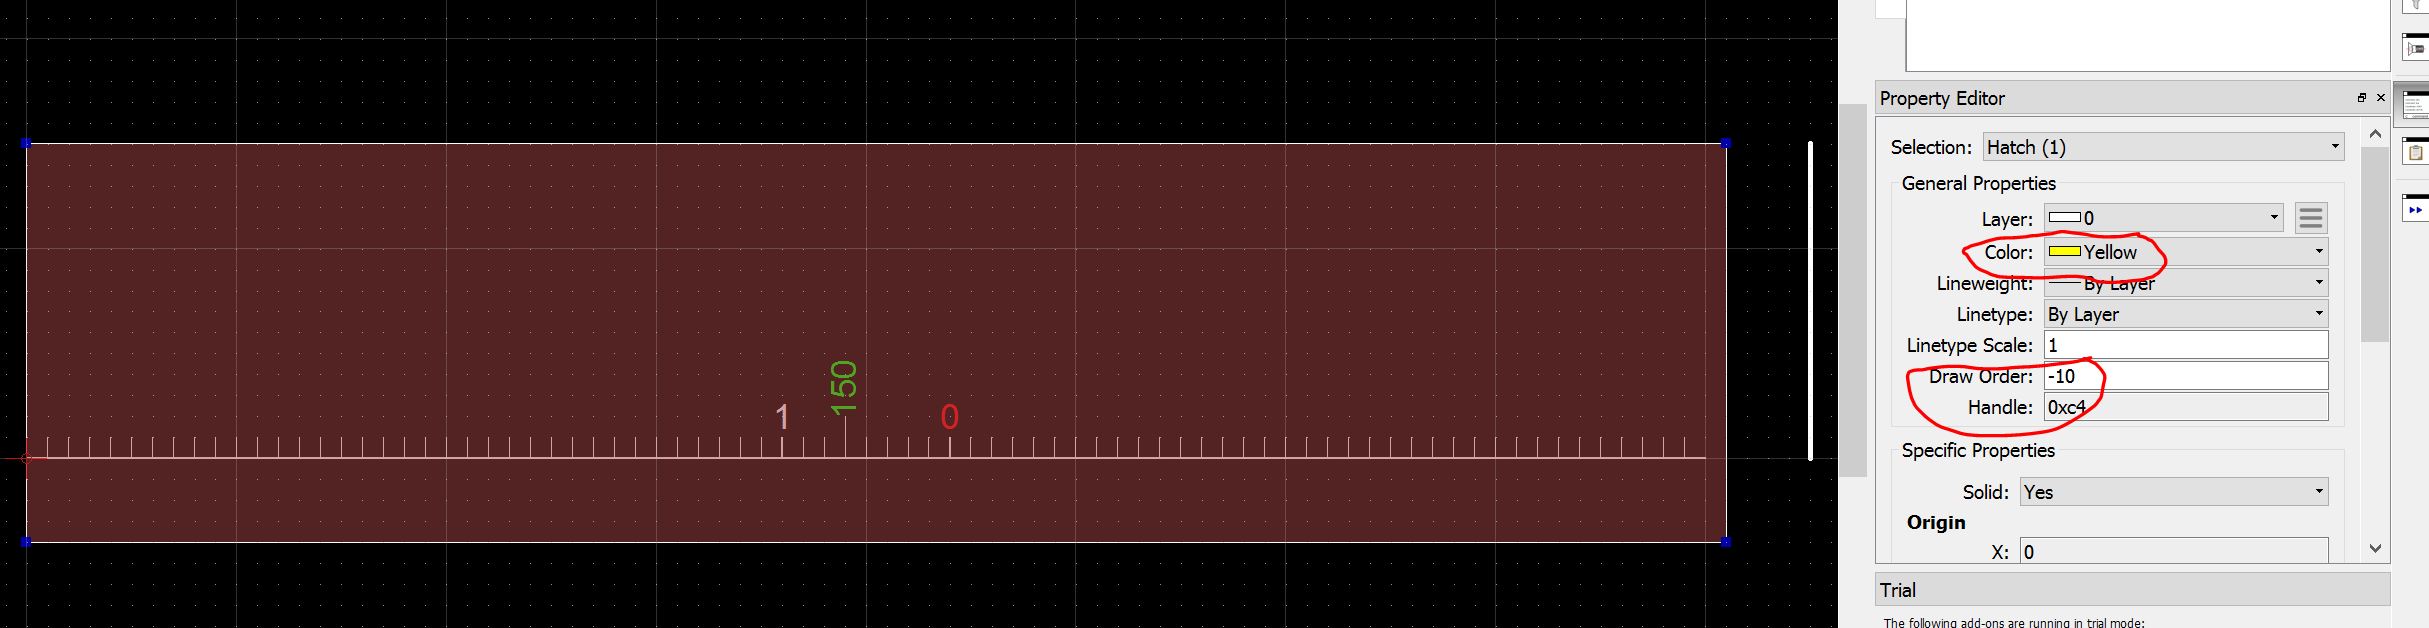
you should end up with something beautiful like this
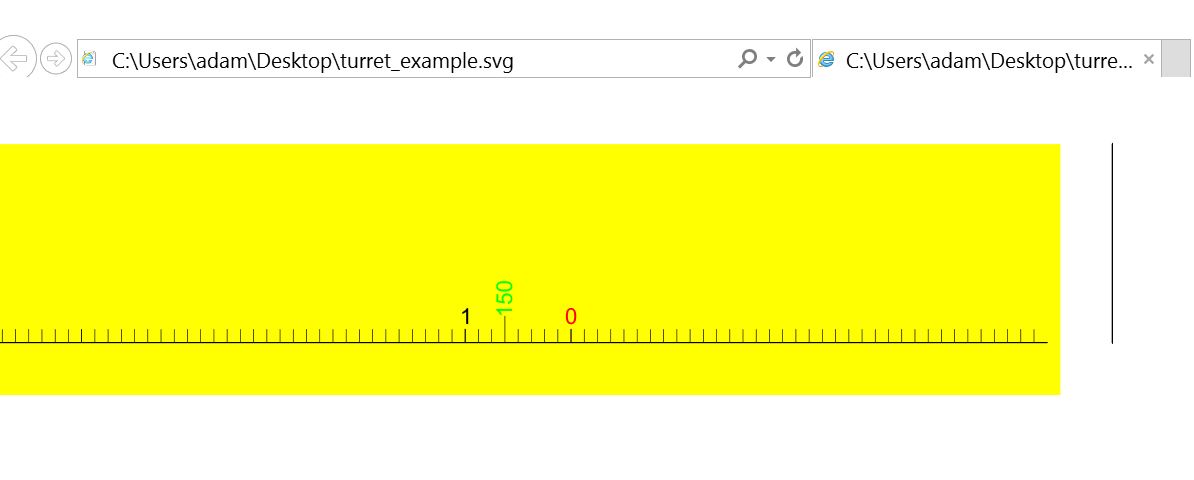
Printing the file
At this point I would suggest printing this out and making sure that it matches up with your scale.
To do this we need to exit the program and reopen it to re activate the pro tools. So, save the project File > Save as (ignore the warning) then close the program and re-open it again.
Now, you can click the little icon which says svg on the toolbar, just under Dimension and then save the file somewhere, the desktop is always a good bet.
Now, you can open this file in internet explorer and then just print it as you would anything else.
Arts and Crafts
NOTE! I have recently had good experience with 'waterproof inkjet vinyl' which is about £1 a sheet from ebay or amazon, you can print directly on this and then just cut out and stick!
The final step in the puzzle is to protect the wrap and stick it on the turret.
Trim the wrap out and then laminate it. I used Scotch Magic Tape as its goes clear and wont yellow. Plus being a bit stiffer it gives the wrap a nice laminated looks.
I stuck magic tape on both sides of the wrap then trimmed it around
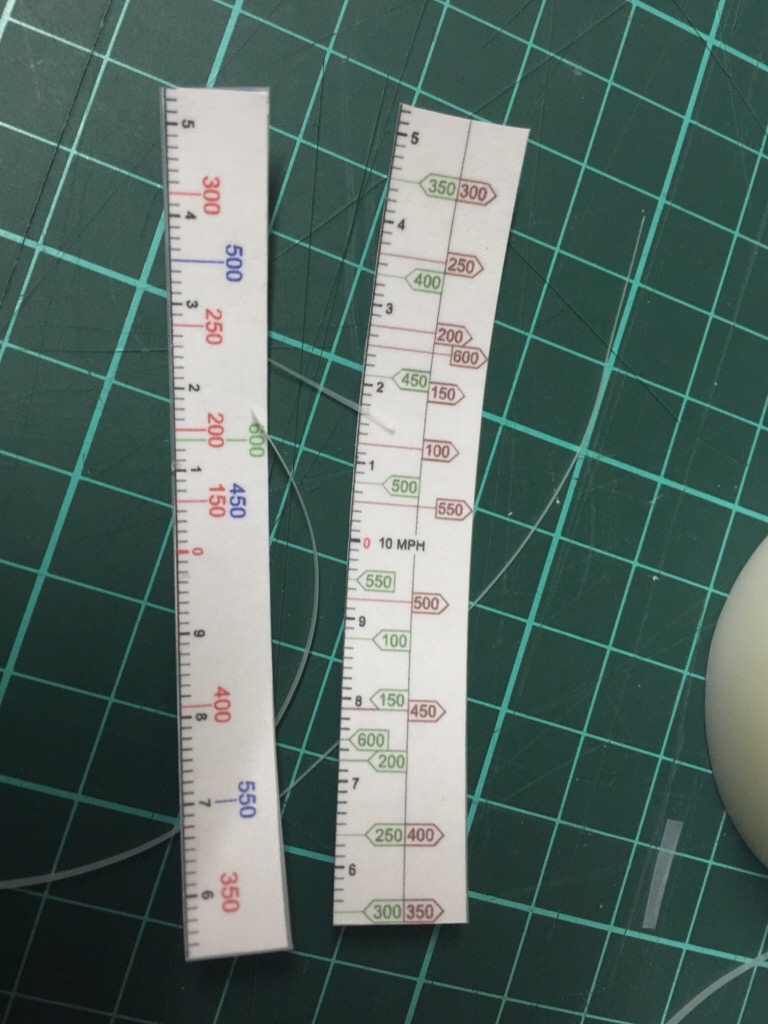
Then I stuck another piece of tape over the front, and trimmed the top and bottom but not the sides
Then I stuck one side down to the turret, pulled the wrap tight and stuck the other edge, job done!


